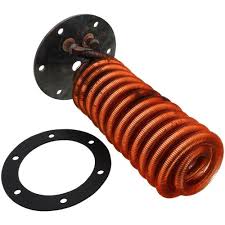
Tankless coils are an essential component of boiler systems that provide domestic hot water on demand without the need for a separate water heater. Over time, these coils can become clogged with mineral deposits or develop leaks, leading to decreased efficiency and a reduced supply of hot water. When this happens, it may be necessary to replace the tankless coil to restore the boiler’s performance. This guide will walk you through the process of replacing a tankless coil, from identifying the issue to installation and testing.

Signs That Your Tankless Coil Needs Replacement
Before jumping into the replacement process, it’s essential to confirm that your tankless coil is the problem. Common signs include:
- Insufficient Hot Water: If your hot water supply is inconsistent or inadequate, the coil may be clogged or damaged.
- Leaking Water: Leaks around the boiler or dripping from the coil area indicate a problem.
- Rusty or Discolored Water: This could be a sign of corrosion inside the coil.
- Boiler Overheating: A malfunctioning coil can cause the boiler to overheat as it struggles to meet hot water demands.
If you notice any of these symptoms, a coil replacement might be necessary.
Tools and Materials Needed
- Replacement tankless coil
- Gasket set
- Wrenches and socket set
- Pipe wrench
- Screwdrivers
- Bucket and towels
- Pipe sealant or Teflon tape
- Cleaning solution or vinegar (for descaling if necessary)
- Protective gloves and safety glasses
Step-by-Step Replacement Process
Step 1: Turn Off the Boiler and Water Supply
- Shut Down the Boiler: Turn off the boiler’s power supply to ensure safety.
- Close Water Supply: Close the water supply valve feeding the boiler to prevent flooding.
Step 2: Drain the Boiler
- Attach a Hose to the Drain Valve: Locate the drain valve at the bottom of the boiler. Attach a hose and direct it to a drain or bucket.
- Open the Drain Valve: Open the drain valve and allow the boiler to drain completely. This step is crucial to prevent water spillage during coil removal.
Step 3: Remove the Old Coil
- Disconnect the Pipes: Use a pipe wrench to disconnect the water supply and return pipes from the coil. Be prepared for any residual water to drain out.
- Remove the Bolts: Unscrew the bolts securing the coil plate to the boiler. You may need a socket set to remove these.
- Remove the Coil: Carefully pull the old coil out of the boiler. If the coil is stuck due to mineral deposits or rust, gently tap around the edges to loosen it.
Step 4: Clean the Mounting Surface
- Clean the Area: Scrape off any old gasket material and clean the mounting surface on the boiler with a rag or scraper.
- Check for Damage: Inspect the opening for any signs of corrosion or damage. If severe, consult a professional before proceeding.
Step 5: Install the New Coil
- Apply a New Gasket: Place the new gasket that came with your coil onto the mounting surface. Apply a light coating of pipe sealant or Teflon tape to the threads of the new coil.
- Insert the New Coil: Carefully align the new coil and insert it into the boiler, ensuring that it sits flush against the gasket.
- Secure the Coil: Replace the bolts and tighten them evenly in a criss-cross pattern to ensure a uniform seal.
Step 6: Reconnect the Pipes
- Reconnect the Water Supply and Return Pipes: Use a pipe wrench to securely reconnect the water pipes to the new coil. Apply Teflon tape or pipe sealant to the threads to prevent leaks.
Step 7: Refill and Bleed the Boiler
- Close the Drain Valve: Ensure the drain valve is closed before refilling the boiler.
- Open the Water Supply Valve: Slowly open the water supply valve to refill the boiler. Monitor the pressure gauge to ensure the system reaches the correct pressure.
- Bleed the System: Use the bleeder valves on the boiler to release any trapped air. This step prevents airlocks, which can hinder system performance.
Step 8: Turn on the Boiler and Test
- Power Up the Boiler: Restore power to the boiler and set the thermostat to call for heat. Allow the boiler to run and check for any leaks around the coil.
- Test the Hot Water: Turn on a hot water faucet to ensure the new coil is heating water effectively. Check for consistent water temperature and pressure.
Maintenance Tips for a Long-Lasting Coil
- Regular Descaling: In areas with hard water, descale the coil periodically to prevent mineral buildup that can reduce efficiency.
- Annual Inspections: Have a professional inspect the boiler and coil annually to catch any issues early.
- Check Water Pressure: Ensure the water pressure remains within the recommended range to prevent stress on the coil.
Replacing a boiler tankless coil can seem daunting, but with the right tools and a systematic approach, it is a manageable DIY task for those familiar with boiler systems. If you’re not comfortable performing this replacement yourself, always seek the help of a professional to ensure safety and proper installation. Regular maintenance and prompt replacement of faulty components will help keep your boiler running efficiently for years to come.
